You know the drill. Your truck is packed, the hitch ball is attached, and you back out of the driveway. Then the rear end drops like it swallowed a bowling ball. That sag is not just ugly. It is dangerous. It shifts weight off the front tires, making your steering feel like you are pulling a stubborn mule through mud. You are trying to navigate a highway, but the physics of your setup are fighting against you.
If your vehicle’s receiver hitch sits too high for your trailer, you need a drop hitch receiver. This is not a luxury item. It is a mechanical fix for a real problem. A drop hitch receiver changes the vertical height between your vehicle’s hitch point and the trailer’s frame. By lowering the connection point, you level the trailer tongue. This distributes weight more evenly across your truck’s or car’s rear axle, preventing the front-end lightness that leads to loss of control.
Why Trailer Sag Ruins Steering Control
When a trailer is connected too high, the tongue weight pulls up on the back of your vehicle. This unloads the front suspension. Your front tires lose traction. Steering becomes vague, and stopping distances get worse. In an emergency, that lack of front-end weight can mean the difference between correcting a drift and spinning out.
The solution is geometry. You need to match the height of your hitch to the height of the trailer’s frame. If your truck has a high-rise hitch and your trailer has a standard frame, you have a mismatch. A drop hitch receiver bridges that gap. It bolts into your existing square receiver tube and drops the connection point down, putting the trailer on level ground.
How Drop Hitch Receivers Work
A drop hitch receiver is a square steel tube that fits into your standard 2-inch or 2.5-inch receiver opening. It is not a universal plug-and-play device in the sense that one size fits all scenarios perfectly. You must measure the vertical distance between your vehicle’s receiver hole and the trailer’s frame or tow bar.
Once you have that measurement, you select a drop hitch with the correct drop height. These accessories typically range from 2 inches to over 10 inches of vertical adjustment. The goal is to ensure that when the trailer is attached, the trailer frame is perfectly horizontal. If the trailer is level, the weight transfers correctly to the rear axle. If it is not, you are fighting physics every time you turn the wheel.
A level trailer is a stable trailer. A sagging vehicle is a warning sign that your hitch setup is wrong.
Choosing the Right Drop Hitch Receiver
Not every vehicle and trailer combination requires the same drop. You need to know your specific dimensions. Here is how to figure out what you need.
- Measure your vehicle’s receiver height. Stand the vehicle on a flat surface. Measure from the ground to the center of the receiver opening.
- Measure your trailer’s frame height. Measure from the ground to the center of the trailer’s tow frame or tongue bar.
- Calculate the difference. Subtract the trailer height from the vehicle height. If the vehicle is higher, you need a drop hitch with a drop equal to that difference.
For example, if your truck’s receiver is 28 inches off the ground and your trailer’s frame is 24 inches, you need a 4-inch drop hitch. This ensures the trailer sits level. If you skip this step and just guess, you might end up with a trailer that is still tilted. That defeats the purpose.
Most manufacturers make drop hitches for common vehicles. If you drive a standard pickup, SUV, or van, there is likely a specific part number designed for your model. Look for hitches rated for your specific vehicle year and make. Using a generic drop hitch without checking vehicle compatibility can lead to fitment issues or reduced towing capacity.
Common Mistakes to Avoid
The biggest mistake is ignoring the weight rating. A drop hitch receiver must support the tongue weight of your loaded trailer. If you buy a cheap, unbranded drop hitch, it may not have the structural integrity to handle heavy loads. Stick with reputable manufacturers who provide weight ratings.
Another error is assuming that a drop hitch fixes everything. It fixes height mismatch. It does not fix an overloaded trailer. You still
Why Towing Accessories Still Allow for DIY Work
Most modern vehicles have buried critical systems under layers of sophisticated electronics. Getting into the engine bay usually means wrestling with a computer. Towing gear is different. It remains a place where the average driveway mechanic can still get their hands dirty without needing to be a software wizard. If you are ready to bolt on a drop hitch receiver, the process is straightforward, but the setup has to be precise.
How to Determine the Correct Drop Hitch Height
This is the step that trips people up. You need to know exactly how much vertical separation exists between your vehicle’s hitch receiver and the trailer’s coupler. Getting this wrong leads to poor towing dynamics, potential damage, or a trailer that sits dangerously low.
Do not guess. Measure twice.
- Measure from the ground to the top of the inside diameter of your square receiver tube.
- Measure from the ground to the bottom of the trailer’s coupler.
Subtract the first number from the second. The difference in inches tells you exactly how much drop (or rise, if the trailer is higher) you need. If you want flexibility, look at an adjustable drop hitch receiver. These units let you select from several drop heights using the same assembly, saving you the headache of buying multiple hitches if you tow different trailers.
Matching Your Ball Size to the Trailer Coupler
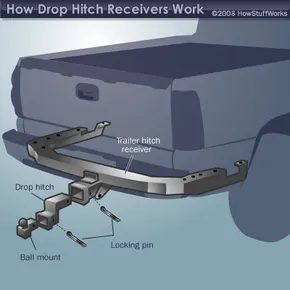
Once the vertical alignment is sorted, the hardware has to fit. The entire trailer hitch assembly is built from simple, robust components. It starts with the trailer hitch receiver, a tubular steel frame welded to the underside of your vehicle. It features a square opening, typically ranging from 1 ¼” to 2 1/2″ across depending on the class.
Into that opening goes the drop hitch. This is a section of rectangular welded steel that extends the reach of the standard receiver. It secures to the vehicle’s hitch with a locking pin.
Next is the ball mount. This piece mates a short length of square steel tubing to a thick steel flange. That flange has a hole drilled through it, which serves as the platform for the hitch ball. The ball mount connects to the receiver via another locking pin. The hitch ball itself is secured to the mount by a threaded shaft and a locking nut.
Here is the critical check: make sure the diameter of your hitch ball matches the size of your trailer’s coupler. A mismatch will not only look ugly but can create dangerous leverage points. If you cannot figure out the proper specifications for your accessories, do not wing it. Take the vehicle to a reputable dealer or a tow kit customization shop. They can verify the load capacity and ensure the hardware is correct for your specific setup.
Understanding Towing Capacity Limits
Before you install anything, you need to know if your vehicle can handle the load. Always check your owner’s manual for towing limitations. Exceeding the design weight overworks the engine and brakes, substantially increasing the odds of an accident.
In the United States, tow hitch receivers are ranked by gross trailer weight (GTW), which includes the weight of the trailer plus its contents.
- Class 1: 1,000 to 2,500 pounds GTW
- Class 2: 3,500 pounds GTW
- Class 2.5: 4,000 pounds GTW
- Class 3: 6,000 pounds GTW
- Class 4: 8,000 pounds GTW
- Class 5: 10,000 pounds GTW
If you are buying a new vehicle, look for a “towing package.” These often include beefier brakes, a larger capacity cooling system for the engine, and the necessary towing hardware. It is a safer bet than trying to retrofit heavy-duty gear onto a base model that wasn’t designed for the strain.
Why “Bolt-On” Towing Equipment Demands More Than Just a Socket
Most drop hitch receivers and towing accessories advertise themselves as “bolt-on.” The pitch is simple. Grab a socket wrench, attach the parts, go. No welding. No complex wiring harnesses. No cutting into the vehicle’s frame. If you need a welder, it’s not a bolt-on install.
But the reality on the floor is different.
Experienced mechanics know that “bolt-on” rarely means “plug and play.” It usually implies some filing. Sawing. Crow bar adjustments. You might need to jimmy a bracket into a specific shape to make it sit flush against the vehicle’s structure. The fasteners have to torque down to exact specifications. Locking washers go on as directed. Miss those steps and you risk compromising the vehicle’s safety or handling performance. If you’re uncomfortable with the work, call a professional. Towing equipment fails under stress, and stress is exactly what you’re creating.
How to Install a Drop Hitch Receiver
This is where things get surprisingly easy.
A drop hitch is actually simpler than a standard bolt-on receiver. You don’t drill. You don’t modify the frame.
- Insert the drop hitch into the car or truck’s existing receiver hitch.
- Secure it with a locking pin.
That’s it. No torque spec for a frame bolt. No file work. Just a mechanical fit. The drop hitch changes the angle of the ball mount, allowing you to tow trailers that sit lower than the standard 2-inch receiver allows. It’s a quick fix for geometry issues.
Which Accessories Improve Towing Stability?
Once the hitch is installed, the real challenges begin. Wind gusts. Passing semi-trucks. Drivers who don’t understand spatial awareness. Towing is more demanding than normal driving. Stopping distances increase. Turning radius grows. You have to plan ahead.
To counter this, manufacturers offer a range of accessories:
- Weight distribution hitches: These transfer tongue weight to the front axle, preventing the rear of the vehicle from sagging.
- Sway control devices: These dampen side-to-side trailer movement.
- Stabilizers: These add friction or mechanical resistance to prevent oscillation.
These systems are more complicated to install than a simple drop hitch. But they buy back stability. Whether you’re hauling a boat, an RV, ATVs, or horses, these tools help keep the load under control. They don’t eliminate the need for caution, but they reduce the variables that can turn a routine trip into a dangerous one.
“Whether you’re towing a boat, an RV trailer, ATVs or horses, you’re supposed to be having fun!”
The goal is to return a sense of control. You can’t eliminate traffic or weather, but you can mitigate the physical forces acting on your rig.
Where to Find Detailed Towing Resources
The basics are covered. But towing involves specific regulations and technical details that vary by location and vehicle type.
For deeper technical guidance, check the following resources:
- National Highway Traffic Safety Administration (NHTSA): Look for their guide on being equipped for safety when towing a trailer.
- California Department of Motor Vehicles: Their “Towing Your Trailer Safely” publication breaks down state-specific legal and safety requirements.
- National Association of Trailer Manufacturers: Useful for industry standards and trailer-specific data.
- DropHitch.com: Offers definitions and specific specs for various towing scenarios.
- Etrailer.com: Provides detailed advice on choosing the correct ball mount for your specific setup.
- Caravan and Camping Industry Association (Australia): Their “Towing Your Trailer” guide is particularly relevant for those operating in that region.
These documents provide the torque specs, weight limits, and legal frameworks that the quick install guides often skip. Read them before you hit the road.