A car fuse does one thing. It protects the wiring.
Simple as that. If you pull a fuse because your radio sparked and died, don’t blame the fuse. The fuse is just the sacrificial lamb. It blew because the radio had already failed, drawing way more current than the wire could handle. The wire itself? That’s the expensive part. Replacing a harness is a nightmare. Replacing a radio is a Tuesday afternoon job. The fuse exists to save you from the harder repair.
Size matters. Location matters.
Your vehicle likely uses two distinct fuse panels to keep things organized and accessible.
Under-Hood Protection
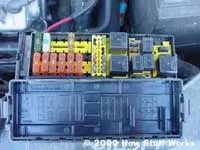
The first panel sits in the engine compartment. It’s usually a black box near the battery or firewall. This is where the heavy hitters live.
You’ll find fuses for the cooling fans here. If those fans stop working and the engine overheats, you’re looking at a warped head gasket. Not cheap. The anti-lock brake (ABS) pump draws serious power. It needs robust protection. The engine control unit (ECU) also gets its own dedicated fuses. These components are all located in the engine bay because that’s where they operate. Keeping their fuses right there makes sense. It keeps the circuit logic local.
Cabin Fuse Panel
The second panel hides in the passenger cabin.
Look near the driver’s knees. Pull back the trim panel under the dash. There it is.
This box handles the low-voltage, high-frequency stuff. Headlights. Turn signals. Window switches. The radio. The air conditioning controls. These devices are inside the car, so their protection is centralized nearby.
Why two panels? Because running a single fuse box from the trunk to the hood to the dash is impractical. It creates massive voltage drops and confusing wiring looms. Splitting them by zone is standard engineering.
“The fuse is there to protect the wire, which would be much harder to replace than the radio.”
Most modern cars follow this split. Some luxury brands might add a third panel under the rear seat or in the trunk for audio systems. But the two-panel setup remains the industry standard for a reason.
It’s not complicated. It’s just protection.
When your headlight flickers, check the cabin panel first. When the engine won’t start, check the under-hood fuses for the ECU or fuel pump. Don’t guess. Look at the diagram. Every car comes with a fuse box cover that shows you exactly which slot does what.
Misreading a diagram costs time. Time costs money.
But a blown fuse? That’s cheap insurance.
Understanding Fuse Construction and Fusible Links
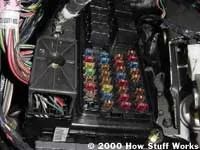
Heat isn’t just a byproduct. It’s the mechanism. The wire inside heats up based on resistance and current flow. Fuses exploit this. They are specialized wires encased in plastic with blade connectors. This design allows them to break the circuit before damage spreads.
Most cars use these blade fuses. You’ll find them in the dashboard or under-hood block. But not all protection comes in a removable package. Some systems rely on fusible links. These are sections of wire integrated directly into the vehicle’s wiring harness. They don’t plug in. They are soldered or crimped into the main power feed.
Why Fusible Links Matter
You might wonder why a car needs both types. Blade fuses are serviceable. You can swap them in seconds. Fusible links are permanent. They protect critical circuits that handle high amperage. Think starter motors or alternator feeds. If a short occurs there, a standard fuse might melt too slowly. A fusible link is designed to snap cleanly. It isolates the fault.
The plastic housing of a blade fuse does more than hold the metal. It contains the arc. When the wire melts, it creates plasma. The plastic stops that plasma from igniting surrounding wires. Fusible links lack this housing. That’s why they are placed in protected areas of the chassis.
Identifying the Difference
How do you tell them apart? Look at the connector. Blades have two flat prongs. They slot into a receiver. Fusible links look like a thick wire with a rubber boot. The boot usually has a rating printed on it. 30A. 40A. 60A. If it’s not a removable plug, it’s likely a link.
Some modern vehicles use both. A fusible link protects the main cable from the battery. That cable then feeds the fuse box. The fuse box handles the finer details. Headlights. Radio. Window motors. Each has its own blade fuse. The fusible link is the last line of defense. It stops the fire before it reaches the cabin.
The Physics of Melting
Current creates heat. Resistance limits current. The fuse balances these forces. Thicker wires carry more amps. They take longer to melt. A 20-amp fuse will hold steady under 15 amps. It trips at 20. It melts at 25. This margin allows for brief surges. Engine cranking spikes current. The fuse must survive that spike. Otherwise, you’d replace it every time you started the car.
Fusible links have similar margins. But their placement makes them less forgiving. They are closer to the power source. A short here bypasses the fuse box entirely. The fusible link must react faster. Its material composition is slightly different. It has a lower melting point relative to its thickness. This ensures it blows before the wiring insulation chars.
When Things Go Wrong
Blade fuses fail often. They are exposed. Vibration loosens connections. Corrosion creeps in. A bad ground can cause a fuse to blow prematurely. You check the circuit. You replace the fuse. It blows again. This means the problem isn’t the fuse. It’s the load. A motor drawing too much current. A short to ground in the wire run.
Fusible links
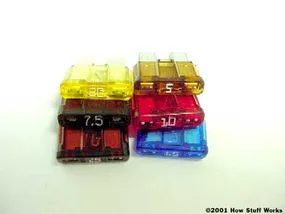
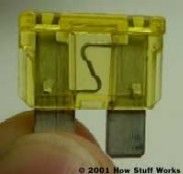
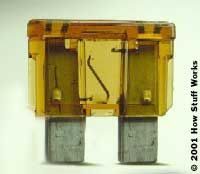
The metal strip inside a standard automotive fuse is the weak link by design. It’s an alloy with a melting point significantly lower than the housing or the contacts it sits in. Manufacturers calibrate this strip with surgical precision. Hit the rated amperage. Heat builds up. The strip melts. Circuit breaks. Power stops.
It’s a simple mechanical failure that saves your wiring harness from turning into a fire hazard.
The Replacement Rule
Once that link snaps, the circuit is dead. You can’t just jump over it. You have to replace it. And here is where people get lazy and cause damage: you must swap it for one with the exact same amperage rating.
Drop in a higher-amp fuse because the original kept blowing? You’re now allowing more current to flow than the wires were designed to handle. The insulation melts. The plastic burns. The car catches fire. Do not do this.
Testing Without Guessing
The only way to be 100% sure a fuse is good is to remove it from the panel. Pull it out. Hook up a continuity tester to the two metal blades. If the tester beeps or the light turns on, the path is clear. The fuse is good.
But don’t check it while it’s still plugged into the car. If there’s a ground fault elsewhere in that circuit, your tester might complete the loop through the vehicle’s chassis rather than through the fuse itself. You’ll get a false positive. You’ll think the fuse is fine. You’ll turn the key. Nothing happens. You’ve wasted time.
Visual inspection is the first line of defense. Look at the metal strip. Is it broken? Is there discoloration or carbon tracking on the plastic body?
The hidden wiring in your dash
You’re looking at the back of the radio now. It’s not just a plastic plate with holes. It’s a maze of pins, slots, and color-coded wires. If you guessed wrong here, you don’t just get silence. You get a short. You get blown fuses. You get a car that won’t start because you fed 12 volts into a 5-volt signal line.
Connectors are the unsung heroes of aftermarket audio. They keep you from having to cut factory wires. Cutting factory wires is the first step toward regret.
Adapter harnesses
The industry standard is the ISO connector. Most European and Japanese cars from the last two decades use it. American cars? They love their proprietary mess. Ford. GM. Chrysler. Each brand has its own pinout. Your adapter bridge the gap. It plugs into the car’s factory harness on one side and your new stereo’s wiring on the other.
This is not optional. Not if you want your steering wheel controls to work. Not if you want your backup camera to display on the new screen. The adapter carries all those signals. Power. Ground. Speaker outputs. And the data lines.
Retaining clips
The clips look simple. Plastic tabs. But they are engineered to snap. If you pull them out by the wires, you break the housing. You lose the clip. Then you’re taping wires to a bracket with duct tape. That’s not a fix. That’s a time bomb.
Use a trim tool. A flathead screwdriver wrapped in tape works if you’re careful. But a proper plastic pry tool costs three dollars. Save it. Save the clips. They are the only thing holding your radio in place while you do 60 mph on the highway.
Pin compatibility
Check the diagram. Always. The adapter might fit physically. The pins might align. But if the car uses a different voltage for the illumination circuit, you’ll fry the backlight. Or the amplifier. Or the head unit itself.
Some cars use variable illumination. Dim the lights, the dash glows. Brighten them, it fades. Your new stereo might only accept on/off. You’ll need a dimmer module. Or you’ll accept that your dash looks like a spaceship cockpit at night. That’s a choice. But check the pinout first.
“The harness is not just about power. It’s about data. Ignore it, and you lose functionality.”
Special cases
Some cars have integrated amplifiers. The speakers don’t go directly from the factory radio. They go through a black box in the dash. If you bypass that with a basic harness, you might get quiet audio. Or no audio at all. You need a specific interface module. One that emulates the amplifier’s signal.
These modules cost more. They take longer to install. You might need to program them. But they save you from replacing every speaker in the car. That’s a huge cost. And a huge hassle.
The final check
Before you push the radio back into the slot. Before you tighten the screws. Plug everything in. Turn the key. Test it.
Power on.
Volume up.
Check the speakers.
Check the lights.
Check the steering wheel controls.
If one thing fails, you have a choice. You can leave it